
Table of Contents:
(Click to skip)Welcome to coffee roasting 101.
You’ve got your first bag of green coffee. Now, it’s time that you have to figure out how to turn this dense, hard, grassy-smelling bunch of grains into the typical brown, aromatic beans that can further be ground, extracted, and made into coffee.
Equipment
For anyone who wants to roast some coffee, the first step (aside from getting yourself some green beans) is to choose one roasting equipment.
These are all possible coffee roasting equipments:
- A skillet over stovetop flames
- Your kitchen oven
- Manual DIY coffee bean roasters sold across the internet
- Heat gun paired with a saucepan (or any metal container with a handle that you can safely grab onto)
- And of course, some kind of professional coffee roasting machine
Bottom line: To start roasting coffee, simply find something that you can safely heat up to around 250~300°C while allowing you to mix and stir the beans evenly enough to avoid uneven roasting (often called “scorching”).
Fancier coffee roasting equipment would not necessarily give you better tasting coffee than the ones you could produce from these basic gadgets. The purpose of those machines is to achieve efficiency and consistency at (much) larger roasting batch sizes while improving the chances of roasting an “excellent batch”, but that’s really a totally different topic. Today, we focus on the process of turning green beans into browned coffee.
Additional things that you should consider before starting to roast your first batch of coffee includes:
Environment & Ventilation:
Make sure you roast in a safe place, without the possibility of causing a fire. Also, during the later stages of a roast, the coffee might start to emit some smoke and aromatic volatile compounds. Make sure that you roast in a place with adequate ventilation, preferably somewhere with ventilation systems (such as under the kitchen’s exhaust hood with the exhaust fan running). Also, the intensity of the smoking and smell also correlates with how “dark” (think of well-done steak) you want to roast the coffee to, so the darker you like to roast, the more important a well-vented roasting space becomes.
Cooling equipment/space:
After you decide to end a roast, you will need some kind of equipment or space where you can let the still-hot freshly roasted coffee cool down to room temperature.For example, you can pour the beans onto a sheet pan where you can spread out the hot coffee beans and let it cool naturally (or blow cool air onto the beans to accelerate the cooling if you want).
Packaging:
After roasting and cooling, you will have some coffee beans that you need to package and store for later consumption. Popular choices includes:- Reusable coffee bags with seals (often from earlier coffee bean purchases)
- Ziplock bags
- Glass jars (preferably air-tight ones)
Tip: Find something that’s air-tight and not containing too much additional “air space” (hence squeezing out the air inside the coffee bag before sealing it is a good practice)
After getting these things ready, now we’re moving on to the next step: firing up your roaster (or your kitchen stove :) ) and let's brown some beans.
The 5 stages of roasting
When discussing coffee roasting, coffee roasters usually divide the process into 3 main different stages, namely the “drying phase”, “browning phase”, and “cooling phase”.
We, however, propose that roasters should look at the roasting process as a full-cycle, hence we added the “preheat” (a very important stage!) and “cooling” phase into the roasting stage discussion for full context.
Phase 0: Preheat
Just like you would preheat your oven before baking chicken in it, we advise that roasters warm-up their roasting equipment adequately before starting their first batch.For those who roast with equipment that have temperature probes (bean temperature or air temperature), choosing a certain temperature and maintaining that reading for an extended period of time (10~20 minutes; even more if you use a large coffee roasting machine) is a common preheating practice.
If your equipment has difficulty maintaining the exact desired temperature reading, idling and cycling within a range around your chosen temperature can also obtain similar preheating effects.
After making sure the roasting equipment is heated sufficiently, now it’s time for you to put in the green coffee and start roasting.
If you are using equipment that has some kind of temperature reading, targeting a starting temperature commonly known as the “charge temperature” is a widespread good practice.
Note that the charge temperature doesn’t need to be the same as your preheat temperature. The preheat temperature serves the sole purpose of warming up your equipment sufficiently while the charge temperature is more related to regulating the “initial energy application” of your roast.
Once the charge temperature is reached (or you judge that the equipment is warmed up adequately), now you can start the roast by dropping the green coffee into the roasting equipment.
Phase 1: Drying stage
For the first couple minutes of the roast, the green coffee, although being heated, wouldn’t demonstrate much change.During this stage of the roast, water is being removed from the green coffee (hence the name “drying stage”) and the overall temperature of the beans will be constantly rising. Some wet, grassy, herbal smells might start to emerge as the roast goes on.
The color of the beans will remain mostly unchanged for the first 1 or 2 minutes. Later on as the roast comes close to entering the next stage, the color of the green coffee would first turn pale (might seem “white”, “pale”), and then it would start to darken and take on some yellow-ish hues.
Note:
- For this stage, just remember to apply steady heat and make sure the beans are agitated adequately and sufficiently. If the green coffee started to turn yellow too early and too unevenly, you might be using too much energy too rapidly. Uneven stirring might also be the culprit.
- Not every type and variety of green coffee would turn pale before starting to yellow. This is normal. Just remember to look out for when the coffee starts to develop some yellow colors since it marks the start of the next stage.
Phase 2: Browning stage
As the coffee beans start to turn yellow, we would say that the “browning stage” has started. This marks the start of the complex chemical reactions that happen during a roast.As the browning stage goes on, the roasted coffee beans will start to smell like baked pastries. Common roasting language would say that this indicates the start of “Maillard reactions”.
As the temperature of the beans rises even more, the yellow coffee beans will start to turn brown. The smell will also start to seem “sweeter” (and more pungent for some people). This is commonly said to be the start of “Caramelization reactions”.
During this stage, the coffee beans will also start to expand in size. This is due to the pressure building up inside each little coffee bean. As the temperature continues to rise, the color of the beans darken even more, the coffee bean continues to expand in size, and we are now set up for the most deciding, exciting, and audible stage of coffee roasting.
Phase 3: Development stage
Pops and cracks known as the “first crack” marks the typical start of the “development stage” during coffee roasting.As the roast goes on further, the coffee beans would start to “crack”, just like what happens when you pop popcorn. We coffee roasting people refer to this audible incident as the “first crack”.
Of course, instead of popping fiercely and bursting open like a corn grain, coffee beans only expand slightly and emit a cracking sound.
See the video for a close-up portrait of coffee beans undergoing live first crack popping action (We thank the production team of Sweet maria’s, another excellent online coffee roasting info source, for this extraordinary and informative video).
After the beans start to crack, you can start to smell different aromas forming and disappearing (rather rapidly). Now you should be ready to end the roast at any moment you desire.
Also, the coffee beans’ color would change from cinnamon to brown, darker brown, and eventually, black. This correlates with the flavor “development” of the coffee beans.
When exactly after the first crack do you decide to stop the roast would be the first and foremost deciding factor of the final roasted coffee’s “roast degree”.
Light roast
cinnamon ~ brown colored1 minute to 1-and-a-half minute after you heard the first couple coffee bean cracks, you can stop the roast, drop and cool the batch, and have a so-called “light roast”.
At this roast degree, you have all the typical “specialty coffee” characteristics: vibrant acidity, distinct aromas, florals and fruits in your cup profile.
However, to truly roast an excellent light roast, “balance” is the name of the game. Specialty roasters are constantly striving to find the perfect “roast profile” (how you apply heat at different phases of the roast) that gives the best cup possible. We will cover more about this in our roasting intermediate writings.
Medium roast
brown ~ dark brown colored1-and-a-half to 2-and-a-half minutes into the development stage, as the first crack quites down and roasty, savory aromas become more apparent, we approach the typical “medium roast” range.
Coffee roasted to this roast degree has a more tamed acidity, darker flavor impressions, and tastes “sweeter” for some coffee drinkers (in contrast to the tangy, acidic, sweet-and-sour light roasts).
Also, some coffees that won’t taste their best at light roast levels might actually shine when roasted to medium. So, even if you identify as a die-hard 3rd-wave light roast fan, don’t be afraid to step into the land of medium roasts. You might be surprised.
Dark roast
dark brown ~ almost black2-and-a-half minutes into the development stage, you might start to hear some faint cracklings again. These cracks don’t seem as loud when compared with the first cracks, and the crackling sounds more like small branches and dried leaves being stepped over continuously. That is the sound of coffee cellulose and other fiber structures breaking and fracturing under high heat. Roasters called this event the "second crack".
Dropping the batch after second crack has started gives you a typical dark roast. This is the roast level where “coffee tastes like coffee”. The average Joe's morning americano.
At this roast degree, roasting notes and the typical coffee flavors are highlighted while most of the green coffee’s distinct characteristics have already been roasted away (or weakened tremendously).
Note:
As we approach second crack, the coffee becomes more and more suspectable to defects caused by overheating. Carefully controlling your heat supply and giving the coffee just enough energy while avoiding charring the beans is the secret to roasting a good dark roast. This might take you a few tries, so don't be discouraged if your first attempt tastes a bit burnt.
Charcoal (Beware of fire!)
black and oilyIf you persist to carry on after the dark roast level, you will see the beans start to “sweat” a lot. That's the oils inside the coffee bean being pushed out due to the expansion of the beans’ cellular structure and the bean itself.
Continuing to roast at this level will eventually turn the whole coffee bean into a piece of black charcoal, while the high roasting temperature combined with the previously mentioned oils rapidly increase the possibility of your coffee beans catching fire.
Unfortunately, we cannot provide flavor notes for this roast level. We do not have the courage nor the desire to bring such torture upon ourselves and our green coffees.
Bottom line: Not recommended.
Phase 3.1: Cooling
We mark this phase as “3.1” (not 4) since we thought that the cooling stage has the ability to heavily influence your final roast outcome just like the development stage does.After you find the perfect roast degree for you and drop the batch, if you cannot cool down the just-roasted, piping hot coffee ASAP, you might end up with a final product darker than you expect.
Our only recommendation for cooling is to find a method that is fire-hazard free and has the ability to cool the beans back to room temperature within 4~5 minutes.
If you roast small batch sizes (smaller than 250g, for example) then this won’t be too hard; but as your batch size increases, it may require more and more cooling/ventilating equipments to cool down the roasted coffee and deal with the smoke emitted from the freshly-dropped roasted coffee. For batch sizes larger than 1kg, professional equipment is recommended.
Finishing the roast
After cooling down the coffee, now you can put them into your selected packaging. Congratulations, you have just roasted your first batch of coffee! You can now go brew yourself a freshly roasted cup of coffee. Or you can choose to “rest” your roasted beans for 7~14 days before drinking.Common theory behind resting is that this allows the freshly roasted coffee beans to “degas” (let off CO2 and other gasses generated by roasting reactions) and might give us a more even and thorough extraction when brewing. However, this doesn’t mean that resting always guarantees you a better cup of coffee. So, the best way to find out the best practice for you is to taste the coffee daily after roasting and keep track of the flavor changes.
Roast degree & flavor
When coffee roasting novices want to learn about how roast degree affects the final coffee’s flavor, we would recommend taking a good look at the OLDER version of the “coffee taster’s flavor wheel” (shown below)
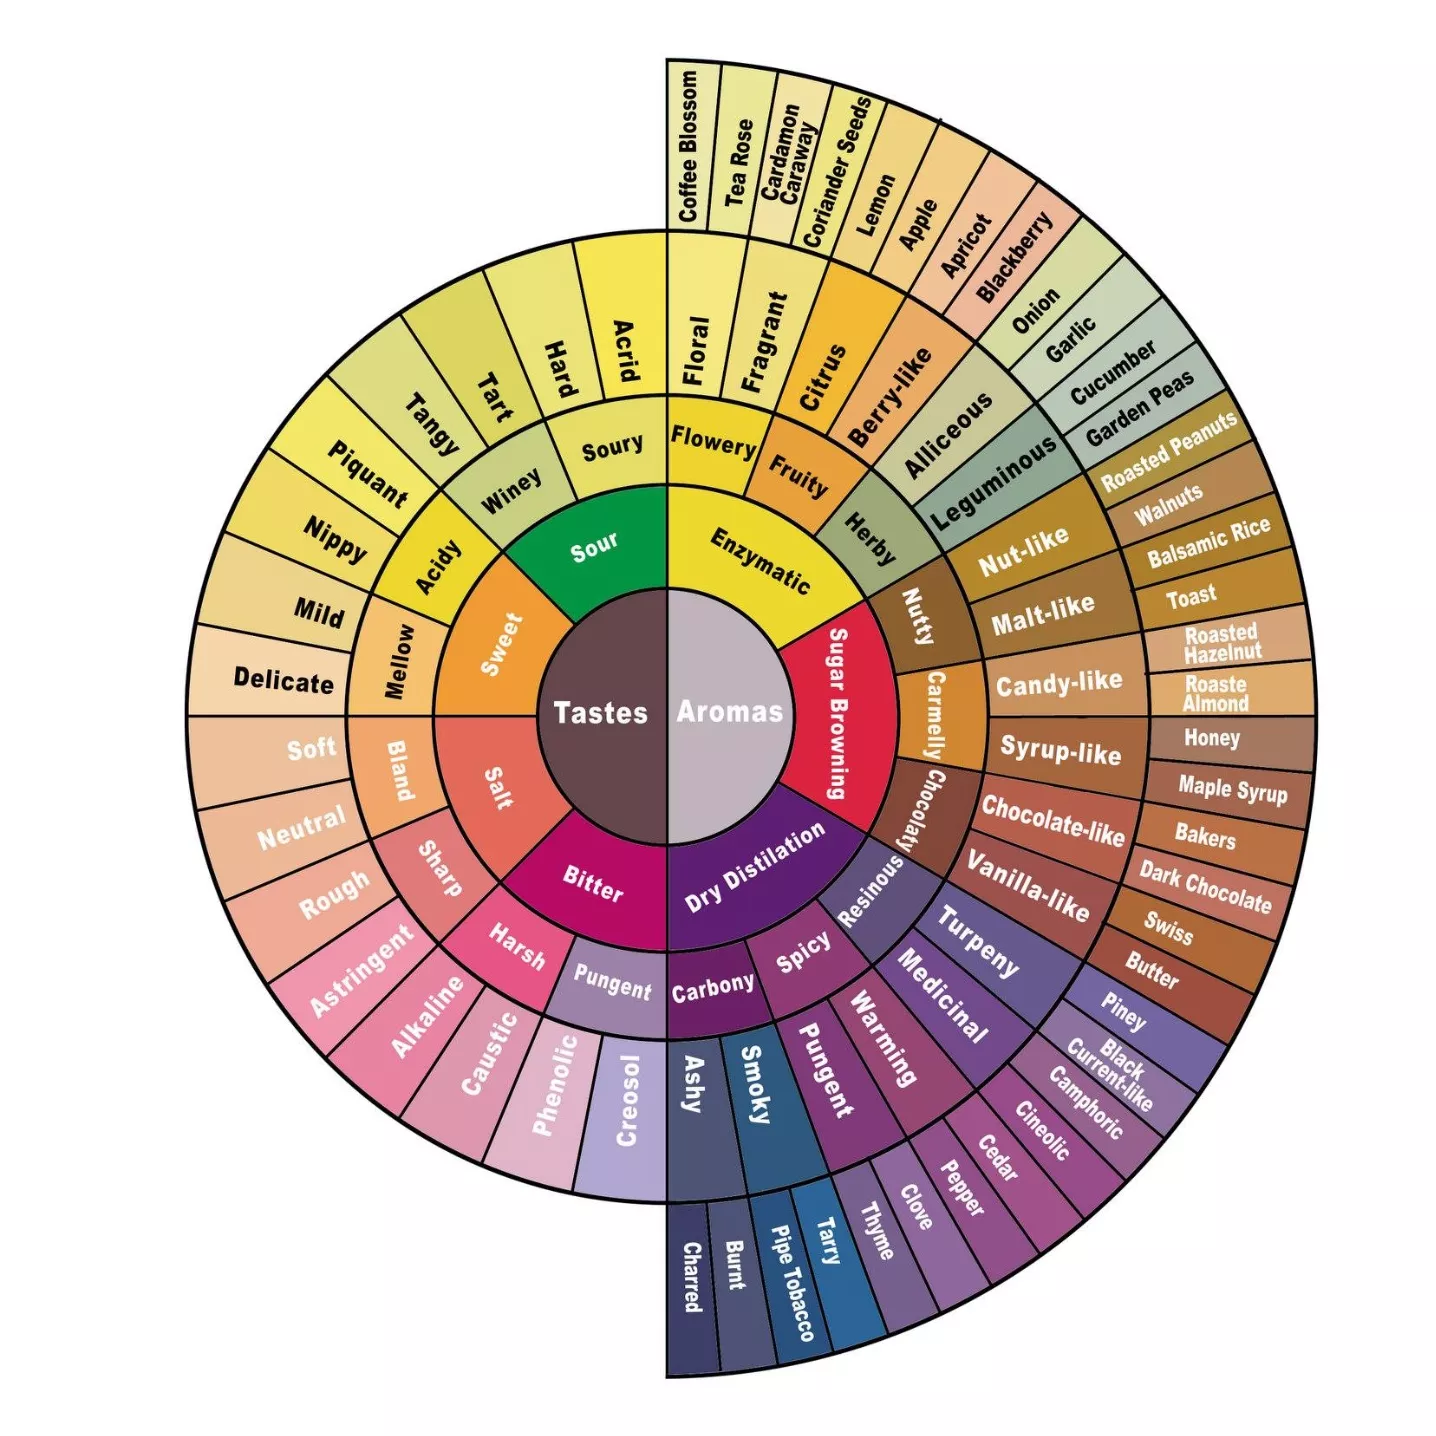
Pay extra attention to the right half of the flavor wheel.
From top to bottom, the aroma descriptors on the right half of the flavor wheel represent the more dominant aroma (and flavor) characteristics of the different roast degrees from light to dark.
We think that all coffee roasters would agree that altering and choosing different roast degrees is the primary method of coffee flavor modulation. A given roast degree would give you a rough structure of the flavor composition, and although fine-tuning the different aspects of a roast could indeed add and alter different nuances, the “main theme” remains quite unchanged.
The graphs below demonstrates the typical aroma/flavor structure of light, medium, and dark roasts.


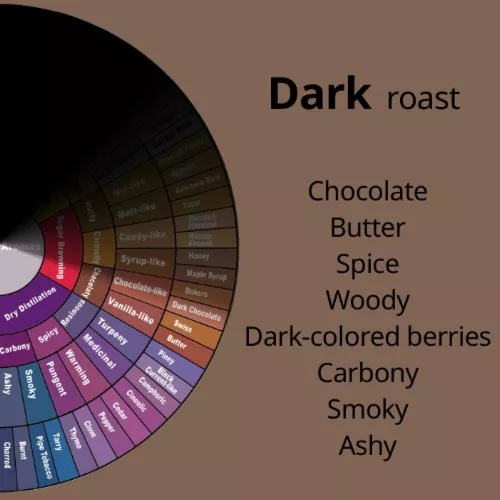
Lastly, before leaving, we would like to talk specifically about one important coffee roasting concept - The “Spread” of coffee’s flavor.
As we can see from the above graph, for each of the 3 aroma/flavor combinations, its descriptor components always spread across at least 2 main aroma/flavor categories.